Turris Omnia - How add new vlans and configuration internal switch

Turris Omnia is one of the best router on the market today. For home purposes it is number one. Today we cover how adding vlans, how configure internal switch, configuration trunk port and we learn what is maximum supported vlans on this perfect router.
For our purposes we must learn about hardware layout and connection of internal components in the internal switch. Look for this picture:
CPU of Turris(Soc, Armada 386 ) has a 3 internal interfaces. It is eth0, eth1, and eth2 from system layout. Interface eth1 is directly connected with physical wan connector(1000BASE-TX or SFP), interfaces eth0 and eth2 are directly connected to internal switch - to port 5 and 6 exactly. Physicals connectors LAN0 - LAN4 are connected to port0-4 of internal switch.
maximum 64 vlans on the internal switch and number 64 is maximum supported vlan ID. Highest ID for vlan is 63.
swconfig command
Log in to turris omnia with ssh. We can show a configuration of internal switch with swconfig command. But first we have to obtain a internal switch name. We can do it with command below:
root@turris-omnia-lon:~$ swconfig list
Found: switch0 - 10.mvsw61xx
switch0
We can see a commands and capabilities about turris internal switch with swconfig dev switch0 help command. On the example below we can see on the first line that maximum supported vlans of internal switch is 64:
root@turris-omnia-lon:~$ swconfig dev switch0 help
switch0: 10.mvsw61xx(MV88E6176), ports: 7 (cpu @ 5), vlans: 64
     --switch
        Attribute 1 (int): enable_vlan (Enable 802.1q VLAN support)
        Attribute 2 (none): apply (Activate changes in the hardware)
        Attribute 3 (none): reset (Reset the switch)
     --vlan
        Attribute 1 (int): port_based (Use port-based (non-802.1q) VLAN only)
        Attribute 2 (int): vid (Get/set VLAN ID)
        Attribute 3 (ports): ports (VLAN port mapping)
     --port
        Attribute 1 (string): mask (Port-based VLAN mask)
        Attribute 2 (int): qmode (802.1q mode: 0=off/1=fallback/2=check/3=secure)
        Attribute 3 (int): pvid (Primary VLAN ID)
        Attribute 4 (unknown): link (Get port link information)
How add vlan and how configure internal switch
In our example we want configure vlans 1,2,3,5,11,63,64 on the port LAN4 internal switch. We connect this port to cisco switch later and enable a trunk port on cisco switch with switchport mode trunk command.
Default vlan - untagged vlan will be a vlan ID 1. We show on vlans ID 63 and 64 that maximum supported vlans is 64. Vlan 63 will be created, but vlan 64 no.
Open file /etc/config/network in your favourite text editor and edit with this config:
config switch
        option name 'switch0'
        option reset '1'
        option enable_vlan '1'
With this config we configure a switch with name switch0, enable vlan support on this switch and reset device.
And add a vlans from our example:
config switch_vlan
        option device 'switch0'
        option vlan '1'
        option vid '1'
        option ports '0 1 2 3 4 5'

config switch_vlan
        option device 'switch0'
        option vlan '2'
        option ports '4t 5t'
        option vid '2'

config switch_vlan
        option device 'switch0'
        option vlan '3'
        option ports '4t 5t'
        option vid '3'

config switch_vlan
        option device 'switch0'
        option vlan '5'
        option ports '4t 5t'
        option vid '5'

config switch_vlan
        option device 'switch0'
        option vlan '11'
        option ports '4t 5t'
        option vid '11'

config switch_vlan
        option device 'switch0'
        option vlan '63'
        option ports '4t 5t'
        option vid '63'

config switch_vlan
        option device 'switch0'
        option vlan '64'
        option ports '4t 5t'
        option vid '64'
We setup vlans 2,3,5,11,63 and 64 on LAN4 as tagged - port LAN4 will be a trunk port for this vlans. Port 5 from internal switch is connected directly tu CPU switch. So we have to configure port 5 as tagged for all our vlans. Vlan with ID 1 is default - untagged vlans and we support vlan 1 on all ports as untagged.
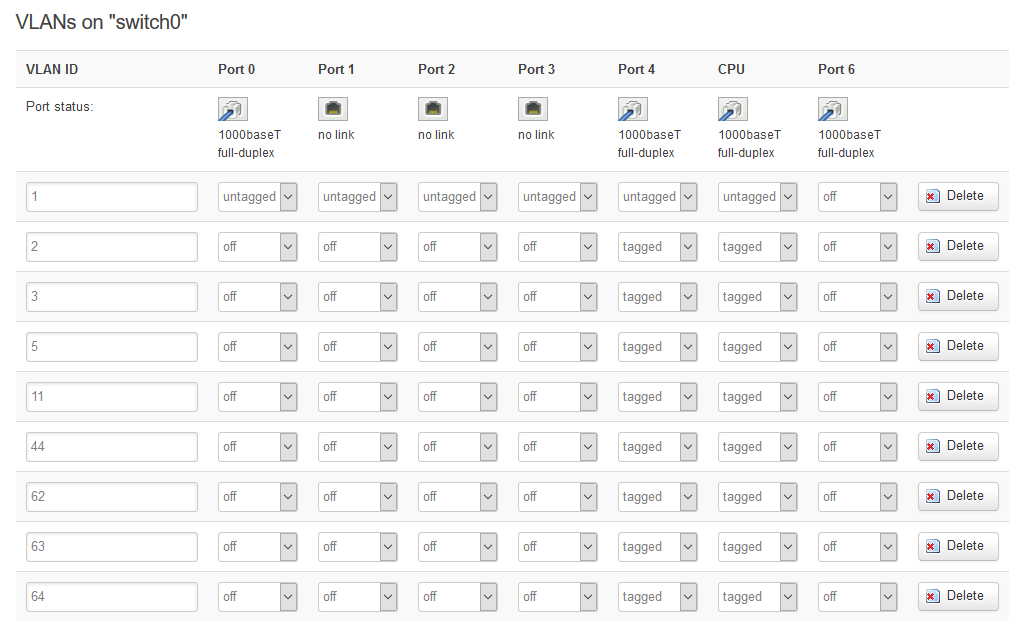
In web interface LuCI in network -> switch will be:
Configuration examine
We back to ssh console now. And we show a switch configuration after networking restart.
root@turris-omnia-lon:~$ swconfig dev switch0 show
Global attributes:
        enable_vlan: 1
Port 0:
        mask: 0x0000: (0)
        qmode: 3
        pvid: 1
        link: port:0 link:up speed:1000baseT full-duplex
Port 1:
        mask: 0x0000: (1)
        qmode: 3
        pvid: 1
        link: port:1 link:down
Port 2:
        mask: 0x0000: (2)
        qmode: 3
        pvid: 1
        link: port:2 link:down
Port 3:
        mask: 0x0000: (3)
        qmode: 3
        pvid: 1
        link: port:3 link:down
Port 4:
        mask: 0x0000: (4)
        qmode: 3
        pvid: 1
        link: port:4 link:up speed:1000baseT full-duplex
Port 5:
        mask: 0x0000: (5)
        qmode: 3
        pvid: 1
        link: port:5 link:up speed:1000baseT full-duplex
Port 6:
        mask: 0x0000: (6)
        qmode: 0
        pvid: 0
        link: port:6 link:up speed:1000baseT full-duplex
VLAN 1:
        port_based: 0
        vid: 1
        ports: 0 1 2 3 4 5
VLAN 2:
        port_based: 0
        vid: 2
        ports: 4t 5t
VLAN 3:
        port_based: 0
        vid: 3
        ports: 4t 5t
VLAN 5:
        port_based: 0
        vid: 5
        ports: 4t 5t
VLAN 11:
        port_based: 0
        vid: 11
        ports: 4t 5t
VLAN 44:
        port_based: 0
        vid: 44
        ports: 4t 5t
VLAN 62:
        port_based: 0
        vid: 62
        ports: 4t 5t
VLAN 63:
        port_based: 0
        vid: 63
        ports: 4t 5t
We can see this result:
vlan ID 64 is not created!!!


